One of the benefits of being a w@w member is being able to learn a lot of DIY ideas. Lots of it!
Now it's my turn to share. =) Even before we formally started the wedding preparations I was already settled to do our invitation. Mainly because I want our wedding to be personalized as much as we can. Second because we wanted to trim down the wedding budget (it keeps on ballooning!!! but God would always leave me in awe for His unfailing provisions..), and third because I love to do any artful constructions, though I'm not that artistic. :p.
But to be honest there were some set backs while doing the invites which tempted me to turn back and have them made by the professionals. While I was doing the computation I realized that the money we would save from getting an invitation supplier will not be that remarkable because I bought most of the materials I used here in Singapore. The ink also costs 35 SGD (the invites consumed 2 inks by the way). I was also too lazy to DIY the envelops so I bought a ready made that cost around 2 SGD/4 pcs. I would also feel down whenever I see beautiful invites. But I really thank the Lord, He refreshes my emotions everyday. I also thank Him for sending Leslie, my barkada since college, here in Singapore. Leslie's such a great help. My ever dependable and full-of-ideas tita Grace has also been a great help, she's been my go to person whenever I'm not confident about my ideas and she would always gladly share hers. DIYs are really more fun when you're doing them with somebody.
Thanks also to sis Aleng for her step by step DIY invitation procedure. I would refer to her site from time to time to check if I'm still doing it rightly. Thanks much sis! You're a star! ^_^
And of course to my fiance, who by this time of writing is already sleeping (no skype convo today, he needs to rise up early for his 7am call time at work :-( ... ), for having a great faith in me, and for being my entertainer, listener and cheer leader while doing the design, while nagging and complaining that it's too difficult and I couldn't do it, when I told him I am so stressed out and I really couldn't do it, while checking for the possible invite supplier, when suddenly I popped him and told him I'm changing my mind of getting a supplier that we will just stick to the original plan, while doing the design again, while printing, while cutting the invites... and the list goes on..the task is really made easier if your fiance has an overflowing sense of humor. :D
And after lengthy introduction, I'm happy present to you our DIY invitation... :)
Showing posts with label DIY. Show all posts
Wednesday, August 3, 2011
Friday, May 27, 2011
Our Save the Date Picture Fridge Magnet
Hey friends! I started doing our Save the Date Photo Magnets the other night. I was able to make 15 photomagnets in one sitting and I'm planning to save the rest for Jay when he comes here next week. Haha!
In this project, I used:
1. Magnetic Sheet (photo in the upper left below) - you can find this at Daiso. This costs 2 SGD per sheet.
2. Scissors (upper right)
3. Paper cutter (lower left)- you can buy this at any school supply shops like the POPular bookstore from 19 SGD and above.
4. Glossy Photo Sticker (lower right) - you can avail this item from POPular bookstore or any office and school supply store. This will cost you around 17 SGD for 20 sheets
5. Printer
1. Using MS Word Software, layout the Save the Date Design according the the size you want. In my case I used 10 cm x 6 cm. With this size, an A4 size paper can contain up to 8 images.
2. Using the cutter, cut the sticker and the magnetic sheet. For my design, 1 magnetic sheet can produce 5 smaller sheets.
3.Peel off the sticker and magnetic sheet and carefully adhere them.
4. Use the scissors to trim the photo magnet to the desired shape. Then you're done! ^_^
In this project, I used:
1. Magnetic Sheet (photo in the upper left below) - you can find this at Daiso. This costs 2 SGD per sheet.
2. Scissors (upper right)
3. Paper cutter (lower left)- you can buy this at any school supply shops like the POPular bookstore from 19 SGD and above.
4. Glossy Photo Sticker (lower right) - you can avail this item from POPular bookstore or any office and school supply store. This will cost you around 17 SGD for 20 sheets
5. Printer
| Magnetic sheet, Scissors, Paper Cutter and Glossy Photo Paper/Sticker |
1. Using MS Word Software, layout the Save the Date Design according the the size you want. In my case I used 10 cm x 6 cm. With this size, an A4 size paper can contain up to 8 images.
| Printed Save the Date Design |
2. Using the cutter, cut the sticker and the magnetic sheet. For my design, 1 magnetic sheet can produce 5 smaller sheets.
3.Peel off the sticker and magnetic sheet and carefully adhere them.
4. Use the scissors to trim the photo magnet to the desired shape. Then you're done! ^_^
| Photomagnet for male guests |
| Photo Magnet for the female guests |
| Our photo magnets on the fridge |
Labels:
DIY,
Photo magnet,
Picture Fridge Magnet,
Save the Date
Sunday, April 17, 2011
Monograms - Please Help Me Choose!
Though I now enjoy creating monograms I have to move on because there are still a long DIY list in queue.
Here are the monograms I like most. Can you please help me pick which is the best? TIA!
Sunday, April 3, 2011
My Third DIY Monogram Attempt
Here's what kept me from disturbing Jay while doing his deployment. Guys please bear with my work, I'm haven't mastered the photoshop application yet. :)
Sunday, March 27, 2011
Monday, March 14, 2011
Our DIY DeCoupage Initials
How was your weekend friends? Mine was rewarding! I've attended a women's encounter last Sunday and I cried a river! I was so overwhelmed with God's presence and my spirit has been revitalized. I thank the Lord He brought me there. With all the stress I've been dealing with recently, my soul really needed to be refreshed and it's only Jesus who could satisfy it.
And here's something I did last Saturday. This is one of our nice-to-haves and I plan to complete J-A-Y K-A-T-E, so please cheer me up! :-)
Thank you Lord for the wisdom. I wouldn't have done it without your guidance.
"And he has filled him with the Spirit of God, with skill, with intelligence, with knowledge, and with all craftsmanship, to devise artistic designs, to work in gold and silver and bronze..."
~Exodus 35:31-32
| In this project, I used Scrapbooking Paper, Ribbons, Stickers, Glue, Scissors, 2-way scotch tape and other scrapbooking materials. You can play with it. Have fun and be creative! :) |
| I bought the wooden letter K already designed but I wasn't able to find for J of same size so I decided to have it redesigned. |
| The finished Product |
Labels:
De Coupage Letter,
DIY
Tuesday, March 1, 2011
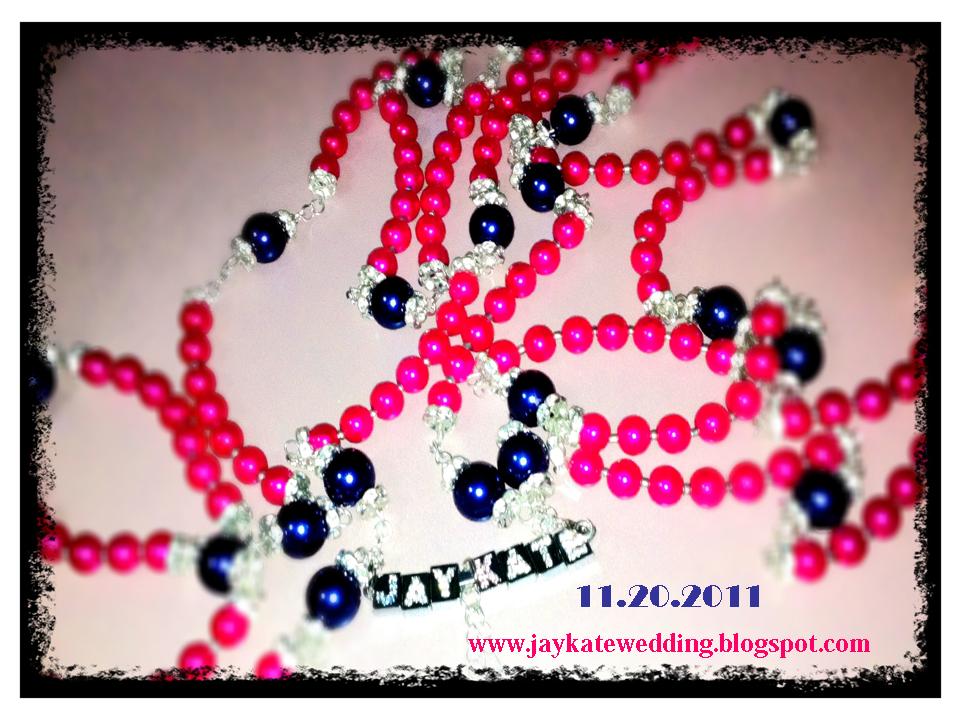
Our DIY Wedding Cord
Inspired by my artistic co-w@wies who patiently DIY-ed their wedding cords, I ambitiously crafted ours too. And after two consecutive nights of complaining to Jay how intricate it was, i still managed to finish it.
Thank you Jay forreciting me poems errr..este singing me songs while completing this project, your voice has relaxed and calmed me..well, it has always been. I so love you!
Thank you Jay for
| To align with our motif, I used hot pink and navy blue crystal pearl beads and some silver spacers |
| These bigger pearls served as dividers for the smaller beads |
| The finished product |
| The wedding cord carries our names. Cool isn't it? |
Labels:
DIY,
Wedding Cord
Monday, February 7, 2011
WYB Cards Print Out
I initially intended to have our WYB cards uploaded in facebook and just have our entou members tagged on the photos but I realized that most of our principal sponsors don't have a facebook account and I have to try my new printer too! so I decided to print it out nalang.
I designed my 2nd WYB Card in www.polyvore.com and had it printed in a photopaper.
Here is the list of items that I used (prices are in SGD)
I designed my 2nd WYB Card in www.polyvore.com and had it printed in a photopaper.
Here is the list of items that I used (prices are in SGD)
- 20 Sheets Photo paper for the WYB card @ 9.90 (I used 12 sheets)
- 25 Sheets label paper for our seal @ 10.70 (I used 3 sheets)
- 45 Pcs A6 Envelopes @ 1.5 per 50 grams
- 20 sheets A4 size tracing paper @ 1.5 per 50 grams (I used 12 sheets)
- 20 sheets A4 size art paper for the WYB Poem @ 1.5 per 50 grams (I used 12 sheets)
- Ink for the printer
- Paper cutter
- Trash bin
- Broom
- Scissors
| WYB Card for our female principal sponsor |
| WYB Poem |
| The seal |
| the finished product |
Labels:
DIY,
Will you be card
Monday, January 24, 2011
Subscribe to:
Posts (Atom)